So Lessons in Waxing 1 laid down the basics for home waxing. I recently mentioned to a friend that I was loving home waxing, and she looked at me like I was crazy! There are several reasons I love doing it myself:
* Cost! Waxing in NYC at a decent (ie: NOT the nail salon's backroom) place can add up. Full leg waxes average $60, and underarms $20. The wax I buy costs $18, and lasts for 3 full leg waxes and 3 underarm waxes. Despite the startup costs, home waxing quickly pays for itself.
* Comfort! I can lay a few towels down anywhere in the apartment and do my waxing while watching tv or listening to music. Really, whenever I get bored and think it's time for a wax, I can easily take out my supplies and get to work.
* Cleanliness! I'm the only one using my wax. Even though salons are supposed to follow certain standards (wearing gloves, never double dipping into wax, etc.), many don't. Doing most of my waxing myself totally satisfies the germaphobe in me.
* Convenience! I can do this on my own time. Not try and fit it into an already busy day.
Obviously, many people think the convenience of having someone else do the deed is worth the cost. I honestly don't mind the process and find it oddly relaxing. It barely hurts now, and the more you wax, the easier and quicker the process becomes. (Exception for bikini waxing, see below tips).
Step-by-step:
1) Place the uncovered wax in the warmer, plug in warmer, and set the heat to high. It should take about 15-20 minutes for the wax to sufficiently melt. Use an applicator to give the wax a good stir until it is smooth and uniform.
2) Test the wax temperature on your wrist before proceeding. I keep my wax heated at a high setting throughout the process (but I also take super hot showers, so heat clearly doesn't bother me). The directions advise turning the heat down to medium after the wax is melted, but I've found that the wax starts to harden a bit and doesn't spread as well when you do this. I'd say use the highest heat setting you can comfortably tolerate.
3) Prep the skin by making sure it is free of lotions and creams. Rub some baby powder over the area to be waxed, making sure there is no excess powder lingering.
4) Dip the applicator in the wax, slowly turning it until the wax stops dripping. Spread a layer onto a section of skin. Smooth the cloth over the wax, rubbing a few times in the direction of hair growth.
5) Holding the skin as tight as possible, grab an edge of the cloth, and quickly pull the strip off in the opposite direction of hair growth. You must go in the opposite direction, otherwise you won't remove much (if any) hair. You want to pull fast and remain as close to the skin as possible. A good rule I've heard is that your pull should be parallel to the skin. Fold over the cloth to use the opposite sides. Any remaining wax can be picked up using clean cloth pieces - just dab and pull up quickly.
6) Move on to the next section of skin. I like to slightly overlap, to ensure that I really get all the hair. My skin turns redder and slightly lighter just after the wax is pulled, so it's easy for me to figure out the next section.
7) Once you're finished with the waxing, tweeze any remaining stray hairs. Then, rub a generous amount of wax remover (I like baby oil) all over the area. This will soothe the skin and loosen any leftover wax.
Waxing tips:
* Buy the best wax for your skin type and the body part you are waxing. A wax designed for use on the face probably won't be very effective on your legs or underarms. Similarly, a creme wax might work better for sensitive skin than a hard wax or honey. Gigi Tea Tree Creme Wax works well for me, but I've read reviews from people who swear by the honey-based waxes.
* I gave the bikini line a third try, and it was (again) a giant fail. Leave this one to a reputable professional. I had marginal luck using the tea tree creme wax and smaller strips, but nowhere near perfect. I'm going to a recommended salon, armed with my No Scream Cream for the nether-regions.
* Hair should be at least 1/4'' long. I have more success when the hair is longer, meaning more hair is pulled from the roots, rather than broken or left in the skin.
* Unlike traditional rules, I apply wax slightly thicker than recommended and still have great results. There is a thickness threshold though, which you'll quickly figure out through trial and error.
* Re-waxing the same area doesn't irritate my skin too much, but I also wait a bit before repeated attempts. It definitely won't feel nice doing the same area twice in a row.
* Lower legs are fairly easy, since the hair grows uniformly downward, and you can get the job done with at least 5-6 full-size strips. Knees and upper legs are tricky. For the knees, I cut small sections of cloth and work in sections. For upper legs, I take care of the weird pattern growth first (inner thighs, back of legs), where the hair tends to grow sideways. Underarms are even more complicated - the hair on mine grow in circles! I use the same method as knees, working with cut strips and small sections in several directions.
*As far as the pain factor, lower legs hurt the least, and underarms hurt the most. You could try a numbing cream before attempting the underarms.
* Strangely, I barely feel anything when I tweeze away the strays. Possibly because the hair follicles are newly shocked? Or maybe because the hairs have been removed from the follicles, but not the skin.
* A handheld mirror and good lighting are very very useful.
* When you first start, you may find that you have regrowth in as little as a week or two. This is totally normal. You're catching the hairs at various growth cycles, so it'll take a while for all hairs to get on the same pattern. Eventually, you should get to where you only need a wax every 3-4 weeks, and any regrowth is very fine and not noticeable.
* Do not wax your face if you use Retin-A, Differin, or any other retinoids. You'll just tear the skin because it's so delicate. If you use any acids (like salicylic acid), you'll want to lay off them for at least a week beforehand.
* Your skin will definitely be tender post-wax, and will probably remain delicate the next day (even though it may look fine). Don't shave or sit in the sun for at least 48 hours afterwards (you may get a painful burn if you do).
Wednesday, February 24, 2010
Monday, February 22, 2010
quotable monday
If you want to know the true cost of what Tiger Woods has lost because of his infidelities, note what was missing when he finally made a public statement Friday.
His wedding ring and his wife.
You can argue whether Tiger's 13-minute confession, which got the TV air play of a presidential speech, was or wasn't scripted, or whether he was truly being sincere. But the absence of his wife, Elin, in this perilous time spoke volumes about just how bad things are for one of the most iconic sports figures in history.
Call me cynical, but I expected Elin to be by Tiger's side. Frankly, that's usually how this situation plays out. You see the doting wife standing by her man, no matter how much embarrassment he has caused. Hillary Clinton did it (a few times). Silda Wall Spitzer did it. And for a time, Elizabeth Edwards did it, too.
Elin's absence is telling. And because of it, I gained a newfound respect for this woman I don't know.
She easily could have allowed herself to be used a prop to garner sympathy and help restore her husband's reputation. But the decision to stay away was more authentic than anything her husband said.
-- Jemele Hill, ESPN
Friday, February 19, 2010
love at first flip

Spotted this while returning the Washed Leather Racer jacket (review to come). I immediately barreled my way over to the rack, oohing and aahing over the details. Jersey soft material! Perfect heather grey! Adorable surprise of striped cuffs! This is one I just might pay retail for!
Thursday, February 18, 2010
lessons in waxing: part 1
I've mentioned my battles with body hair before, and I think every woman goes through a failed self-waxing attempt at some point in their mid-20s. Consider it a rite of passage. You come away with either a load of wax left behind, or bleeding and bruised skin...vowing to never touch the drugstore wax again. I've been there. But, I'm here to tell you that it CAN be done, successfully, and with little pain!
I hate shaving my legs often...the hair grows back fast and thick, and my sensitive skin is prone to razor burn. I did some research, and bought some semi-professional supplies to use at home. I've been doing my lower legs with absolutely fabulous results, and plan on tackling the upper legs, underarms, and bikini line next (will report back for part 2). I hear you all shuddering, but it's really not that bad! Here is everything I picked up from my local Ricky's (you can probably find it all at Sally Beauty Supply too, or Amazon for cheap).
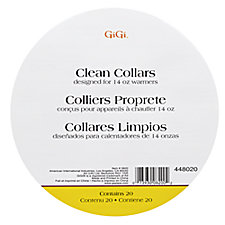 You MUST use these when using any type of wax warmer. Waxing is a messy business, regardless of how careful you are with the application. These collars ensure that no wax will drip on your warmer, and also provide a little ledge to rest the applicator on. One package will last forever too.
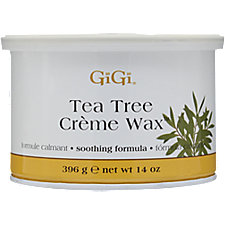 I read a ton of reviews before choosing a wax. First things first, most of the negative reviews are from people complaining about how 'messy' the wax was. ANY wax will be messy, so you should just ignore these. Yes, they are messy, and yes, they can be difficult to remove from the skin. But, if you do it properly and carefully, you can minimize the mess and make cleanup fairly easy. Anyway, the most helpful reviews talked about how well the wax actually worked to remove hair on various body parts. Having had bad experiences with the 'honey-type' of soft waxes (these are often referred to as 'honey,' 'all-natural,' 'sugar-based,' etc.), I went with a creme wax, because I've read it's best for sensitive skin. These will appear opaque (rather than translucent). The Gigi Tea Tree Creme Wax is wonderful for most of my body hair. It removes hair easily, doesn't stick to the skin much, and any leftover wax comes up easily with extra muslin or cloth strips.

These are basically tongue depressors, packaged nicely and marked up slightly. Flat, wood, rounded edges...they'll all do the job. I swiped some of my mom's tongue depressors from their medicine cabinet and they work just fine.
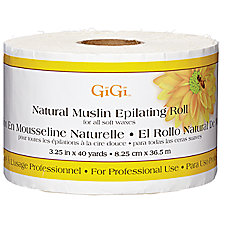 I've used muslin and the paper-cloth ones (more rigid than muslin). I think both are fine, although I slightly prefer the latter. They are slightly easier to remove quickly. Also, when using muslin, the fibers come off the ends and get all over the place. I think some waxes work better with certain cloths, so double check the wax container to know for sure. Both types of strips are fairly cheap, and are more economical when you cut them for size.
EXTRAS!
*No Scream Cream
I haven't used this cream, but I have friends that swear by it for brazilians. I've used numbing creams for laser hair treatments, and it really works. One small tube is pretty expensive, so you may want to save this for the bikini area and underarms.
* Pre-epilation Oil
Reviewers who used hard wax for the bikini area claim this oil really helps lower the pain. It's supposed to work in the same way that powder does - helping the wax stick only to hair and not skin. Will report back once I try it out...
* Wax Remover
You'll most definitely need to use something post-wax to remove the stickies. After early waxing sessions, I would just rub olive oil over my legs. There are a few wax remover lotions available (here, here, here, here), but they seem to work similarly to oil - you still need to scrape around to really loosen the wax from skin. I've recently bought a big bottle of baby oil to use, rather than dumping perfectly good olive oil over my legs.
You're probably wondering if all these products are worth it. Why not just go with the microwaveable type? First of all, having to microwave the container every few minutes is a pain. It was a pain for me living in a one bedroom apartment, with the bathroom about 15 feet away from the kitchen, so imagine how it would be if you lived in a house. It's also messy. It's nearly impossible not to get wax all over those small little containers! Finally, I think the quality of product is better than the microwaveable versions. It removes the hair better, with less pain, and the product stays smooth and even until you hit the end of the container. I will say, though, that drugstore brands can be great option when you're trying to find the best wax for your skin and hair type. The kits have everything you need for a few waxes. If you do want to try a drugstore kit before committing to the whole set above, I'd recommend the Sally Hansen All-Over Body Wax Hair Removal Kit. The wax is a creme wax, and it removes even the most stubborn hair with little leftover wax on the skin. It's also fairly easy to get rid of with a wax remover. Whatever you do, do not even think about Nads or any of those pre-waxed strips (they don't work and tear skin). Look out for my step-by-step and tips in Part 2!
I hate shaving my legs often...the hair grows back fast and thick, and my sensitive skin is prone to razor burn. I did some research, and bought some semi-professional supplies to use at home. I've been doing my lower legs with absolutely fabulous results, and plan on tackling the upper legs, underarms, and bikini line next (will report back for part 2). I hear you all shuddering, but it's really not that bad! Here is everything I picked up from my local Ricky's (you can probably find it all at Sally Beauty Supply too, or Amazon for cheap).
* Gigi Wax Warmer
You'll find this warmer in two versions - one with a simple on/off switch, and one with an adjustable temperature setting. I'd recommend spending a bit more for the adjustable setting. You can warm up the wax quickly, and then set the temperature lower so it's not too hot (but just hot enough to stay melted and usable). It's fairly compact too...mine is stored in its box underneath the bathroom sink. The Gigi warmers can also be used with other brands of wax...I think the containers must be around 14 oz. to properly fit.
* Wax Clean Collars
You MUST use these when using any type of wax warmer. Waxing is a messy business, regardless of how careful you are with the application. These collars ensure that no wax will drip on your warmer, and also provide a little ledge to rest the applicator on. One package will last forever too.* Wax
I read a ton of reviews before choosing a wax. First things first, most of the negative reviews are from people complaining about how 'messy' the wax was. ANY wax will be messy, so you should just ignore these. Yes, they are messy, and yes, they can be difficult to remove from the skin. But, if you do it properly and carefully, you can minimize the mess and make cleanup fairly easy. Anyway, the most helpful reviews talked about how well the wax actually worked to remove hair on various body parts. Having had bad experiences with the 'honey-type' of soft waxes (these are often referred to as 'honey,' 'all-natural,' 'sugar-based,' etc.), I went with a creme wax, because I've read it's best for sensitive skin. These will appear opaque (rather than translucent). The Gigi Tea Tree Creme Wax is wonderful for most of my body hair. It removes hair easily, doesn't stick to the skin much, and any leftover wax comes up easily with extra muslin or cloth strips.* Applicators
These are basically tongue depressors, packaged nicely and marked up slightly. Flat, wood, rounded edges...they'll all do the job. I swiped some of my mom's tongue depressors from their medicine cabinet and they work just fine.
* Strips
I've used muslin and the paper-cloth ones (more rigid than muslin). I think both are fine, although I slightly prefer the latter. They are slightly easier to remove quickly. Also, when using muslin, the fibers come off the ends and get all over the place. I think some waxes work better with certain cloths, so double check the wax container to know for sure. Both types of strips are fairly cheap, and are more economical when you cut them for size.EXTRAS!
*No Scream Cream
I haven't used this cream, but I have friends that swear by it for brazilians. I've used numbing creams for laser hair treatments, and it really works. One small tube is pretty expensive, so you may want to save this for the bikini area and underarms.
* Pre-epilation Oil
Reviewers who used hard wax for the bikini area claim this oil really helps lower the pain. It's supposed to work in the same way that powder does - helping the wax stick only to hair and not skin. Will report back once I try it out...
* Wax Remover
You'll most definitely need to use something post-wax to remove the stickies. After early waxing sessions, I would just rub olive oil over my legs. There are a few wax remover lotions available (here, here, here, here), but they seem to work similarly to oil - you still need to scrape around to really loosen the wax from skin. I've recently bought a big bottle of baby oil to use, rather than dumping perfectly good olive oil over my legs.
You're probably wondering if all these products are worth it. Why not just go with the microwaveable type? First of all, having to microwave the container every few minutes is a pain. It was a pain for me living in a one bedroom apartment, with the bathroom about 15 feet away from the kitchen, so imagine how it would be if you lived in a house. It's also messy. It's nearly impossible not to get wax all over those small little containers! Finally, I think the quality of product is better than the microwaveable versions. It removes the hair better, with less pain, and the product stays smooth and even until you hit the end of the container. I will say, though, that drugstore brands can be great option when you're trying to find the best wax for your skin and hair type. The kits have everything you need for a few waxes. If you do want to try a drugstore kit before committing to the whole set above, I'd recommend the Sally Hansen All-Over Body Wax Hair Removal Kit. The wax is a creme wax, and it removes even the most stubborn hair with little leftover wax on the skin. It's also fairly easy to get rid of with a wax remover. Whatever you do, do not even think about Nads or any of those pre-waxed strips (they don't work and tear skin). Look out for my step-by-step and tips in Part 2!
Monday, February 15, 2010
quotable monday
In a weird way, spin class is kind of a metaphor for your life. You can be riding and sprinting, and the sprint becomes a letting go, or you’re doing a climb, and it’s just like facing a challenge in your life. It strengthens you physically and mentally. It’s so connected to real life. It really helped to strengthen me. It increased my confidence.
You can grow old with [spinning]. It makes you feel athletic. You don’t have to be coordinated to spin. I think people are finding that it’s incredibly empowering. There’s that perfect balance of feeling like you’re getting a personal workout within a large group.
-- Ruth Zuckerman, co-founder of Flywheel Sports
wordless monday = bust
Ok so I only had a handful of Wordless Monday posts, and most of them were a little lame (although I adore pics of our fur baby, I'm not sure he would exactly make anyone else's Monday morning). I've gotten lazy with posts in general (call it a winter slump), and having to find titillating pics for Mondays is the last thing I feel like doing for the blog. WMs = giant fail.
I do, however, come across TONS of quotes or things I read that I find inspiring, interesting, hilarious, or deplorable. So, the blog day formerly known as Wordless Monday will henceforth be known as Quotable Monday. Anything I read throughout the week is fair game, and I might even add some brief commentary.
In other news, I'm slowly coming back to life over here. School has been taking up a ton of time, and I've honestly not shopped for much besides workout gear. We've stayed holed up in the apartment every weekend other than trekking out for a few birthday obligations. All-around boring! I've got some ideas in the pipeline, though, for workout clothing reviews, changes to my fitness regime, skincare, and recipes. Yay!
Saturday, February 13, 2010
cadbury gooey goodness
 Husband and I LOVE Cadbury Creme Eggs (CCEs). Possibly because they have such limited availability (February through April), much like Girl Scout cookies, Candy Corn, and Peeps. Possibly because they are so satisfying to eat, giving a chocolate fix and pure sugar rush from the fondant. We seriously need to exercise control when we visit the drugstore. Anyway, since I'm
 *CCEs are available year-round in the UK.
*CCEs sold in the US are smaller than those sold abroad.

*McDonald's in the UK have a Cadbury Creme Egg McFlurry (genius!)

*They have been deep-fried (sweet Jesus...we need one of these!)

* They have a strange Facebook page (is it a game or a tribute?)
*There is an EHow describing how to eat one (it's complicated business, I know). Some choice lines (is there a hidden message here?):
~ Remove all of the foil at once, or just a little bit at a time if you want to nibble at the egg so the chocolate doesn't get all over your fingers. ~ Bite off the top quarter of the egg. Stick your tongue inside the chocolate shell of the egg to lick out all of the creme filling. ~ Pop the whole egg in your mouth, if you are too impatient to nibble, and relish the squish as the chocolate bursts open to let the fondant spurt out. ~ Challenge yourself to nibble most of the shell off first, leaving the creme filling balanced on a tiny piece of chocolate. Practice until you can leave only the tiniest bit of chocolate possible. ~ Enjoy the brief energy rush that comes from eating 161 calories of sugar.
Regardless of the form you consume them, I hope you get to eat plenty of these before they're gone until next year (or at least eat a few for me)!
Thursday, February 11, 2010
dealing with the elements

Having lived in Michigan, DC, Maryland, and now NYC over the past 10 years, I've acquired and used my fair share of coats. This 'blizzard' that we're in the middle of reminded me of how much I appreciate my well-edited coat closet. If you enjoy seasons throughout the year, this list could be a great one to work towards for a (what I consider) a complete fall/winter wardrobe.
A long puffer coat

Living in NYC, I quickly learned that a short, hip-length puffer coat, wasn't doing anything for me. The long streets and tall buildings create wind tunnels that have, at times, literally almost blown me off my feet. You need solid insulation that will cover and protect you to at least your knees, which I've only really found in a down, quilted coat. I picked up a fab Cole Haan coat on clearance last year and have lived in it this winter. The detailing in the seams and back gives me some shape, instead of looking like a boxy pillow. When looking for a long puffer coat, I'd recommend finding detailing that will show a waist (like a belt, strategic seaming of the quilts, etc.). Obviously, a down-fill or partial down-fill will do wonders for warmth and breathability. Mine has a removable hood with a stand-up collar, which is a nice option. In my opinion, anything longer than knee-length looks like you walked out of the woods wearing your sleeping bag, but I'm sure in a places like Minnesota this could be useful.
You can find these just about anywhere (Old Navy, American Eagle, J Crew, LL Bean, department stores, etc.). Some options I like: here and here.
A 3-in-1 coat

This coat got me through my 4 years at Michigan. A good quality 3-in-1 will be expensive, but will last you forever. I'm going on 11 years with my EMS version, and it still looks great through blizzards, torrential downpours, and spills in the snow . You should find one with a fleece or insulated jacket option that snaps or zips into a waterproof shell. You can wear the shell year-round for the waterproof aspect (in rain or snow), and the insulated layer in the fall. Make sure the shell is waterproof. I'd recommend going with a fleece over the quilted versions, for more versatility.
You can find these at EMS, North Face, Eddie Bauer, LL Bean, REI, or Patagonia.
A fleece coat
 As I said above, the fleece jacket is very versatile. You can wear them on casual days in the fall, or even layer it over sweaters and scarves in the winter. I have North Face and Patagonia fleece jackets, and I think the Patagonia is totally worth the money (the North Face, not so much). The Patagonia has a windproof lining that makes it really really warm (whereas the North Face leaks cold air on windy days), and it has held up really well over the years (10 years now)...the North Face looks old and pilled after just 4 years.
A neutral wool peacoat

The coats above are great functional pieces, but you need a tailored and more dressy option as well! When looking for a peacoat, check out the materials and try and get a feel for it. Wool can be super itchy or super soft, depending on the blend and quality. You should expect to shell out a decent amount for something you'd like to keep for years. I actually have 2 peacoats that I love - a knee-length camel coat from J Crew (the one pictured - Plaza Coat - with Thinsulate, making it really warm), and a calf-length black coat from Macys. I personally love the feel and heft of wool-cashmere blends, and always stay away from double-breasted styles. When you try on coats, consider how they feel with and without thicker sweaters underneath, how they feel when you stretch and move your arms, and how it looks with and without the collar popped.
Monday, February 1, 2010

Subscribe to:
Posts (Atom)